After been married for 10 years and having 5 kids, I finally decided I needed to become a better cook. I was sick of making the same old thing all the time and being afraid to try new recipes. I'm still not a pro but I'm getting better every day. My goal is to be able to make my own recipes up and just be able to throw things together and it taste good. For now I'm just finding YUMMY recipes through blogs and recipe books and I thought making a blog with all my favourites would be fun. So, ENJOY!

Wednesday, June 15, 2011

Chinese Pork Ribs

Here's another recipe I made especially for my meat loving husband. It's also a crock pot meal (from one of my new cookbooks) and was SUPER which always makes it even better :) I didn't end up being able to share these goodies with my family because I went to a RS BBQ. I did try a little bit when I got home though and they were really yummy. My kids told me they thought they were really good which is always an added bonus. I REALLY do LOVE crock pot meals, especially on a day like today when I wasn't at home all day.
1/4 c. soy sauce
1/3 c. orange marmalade
3 T. ketchup
2 garlic cloves, minced
3-4 lbs. country style pork ribs

In a bowl combine the soy sauce, marmalade, ketchup and garlic. Pour half into the bottom of the crock pot. Place ribs over sauce and then poor the remaining sauce over the ribs. Cover and cook on low for 6 hours or until tender and ENJOY :)

S'mores Cookies

A couple of months ago life kind of took a crazy shift and my life kind of turned up side down. After being a bit of a wreck I've finally started to get my life back in order. When I started this blog I was always checking other food blogs to give me ideas but due to my crazy life I stopped checking blogs altogether. When I started to check blogs again I saw this recipe and knew I had to try it. I've been waiting for the right time to try it and tonight was that night. I had all the ingredients which was step one and the next step was going to our RS BBQ where I could take this delicious goodness. I just started another biggest loser contest so I'm trying to eat really well but I couldn't resist these yummies. I had half a piece and quite honestly could have eaten the whole tray. I really love the blog I got this recipe from, I use it a lot, she has TONS of super good recipes so check her out :)11 T. butter, softened (I used margarine)
1 c. brown sugar, packed
½ c. sugar
2 lg. eggs
1 tsp. vanilla
1 tsp. baking soda
½ tsp. salt
1 tsp. cinnamon
2 ½ c. flour
1/2 c. semi-sweet chocolate chips
1 c. mini marshmallows
3 regular sized Hershey’s bars, broken into pieces (I used about 4 1/2 bars)
1-2 packages graham crackers, broken into squares

In a medium bowl, mix together the flour, baking soda, salt, cinnamon and set aside. Cream butter, brown sugar and sugar in mixer until light and fluffy. Add the eggs and vanilla and mix until combined. Add the flour mixture to the butter mixer and combine on low speed. Fold in the chocolate chips and marshmallows. Chill dough in refrigerator for 1 hour to overnight. Preheat the oven to 375F. Line baking pans with parchment paper. I used one 11x16 pan and one 9x13 pan. Lay out graham crackers side by side on the pans as close as possible (they should be touching). I used 24 graham cracker squares on one pan and 12 squares on another but it all depends how much dough you use. Place a scoop of dough in the center of each graham cracker. Press down slightly with fingertips. Bake for 5 minutes then remove from oven. Press a chocolate piece on top of each piece of cookie dough. Bake for another 5–7 minutes or until dough is beginning to turn golden brown at the edges. Remove to a wire rack to cool and then ENJOY :)

Tuesday, June 14, 2011

Shredded Pork Burritos

Well before I say anything else I just want to let you know that this recipe was DELICIOUS :) This is another recipe from one of my new cookbooks, it's actually one I haven't looked all the way through yet but I was flicking through and saw the picture for this recipe and had to try it. My husband LOVES meat! He especially loves the pork burritos at Cafe Rio so I knew he would want to try this. I've done copy cat recipes for the Cafe Rio pork before which were super yummy but this one seemed different (it's NOT trying to be a copy cat) because of the flavours. Anyway I got a couple of new spices and this morning after working out I got everything out, put it all together in about 15-20 minutes, put it in the crock pot and let it cook all day, easy :) I knew I would have way too much because I ended up getting a bigger piece of pork than the recipe called for because they didn't have any smaller ones. We decided to have my mother in law and 2 sister in laws, plus kids over for dinner so we wouldn't have tons of left overs. It's always scary to invite people over when you've never tried a recipe before but thankfully it was a HUGE hit and everyone LOVED it :) The dressing that goes with it is REALLY good as well. This is another recipe we'll be for sure adding to our regular list, YUMMY :)
1 bone-in pork shoulder roast (5lbs but I used about 7lbs)
2 T. plus 1/2 c. brown sugar
4 tsp. paprika, divided
2 tsp. crushed red pepper flakes
2 tsp. ground cumin
1 tsp. salt
1 can (12 oz.) cola
1 c. chicken broth
1 lg. sweet onion, thinly sliced
2 garlic cloves. minced

DRESSING
1 c. mayonnaise
1/2 c. milk
2 tomatillos, husks removed and rinsed
3/4 c. fresh cilantro
1 jalapeno pepper, seeded and cut into coarse chunks
1 envelope ranch salad dressing mix
1 T. lime juice
1/8 tsp. cayenne pepper
Flour tortillas

Cut roast in half. Combine 2 T. brown sugar, 2 tsp. paprika, red pepper flakes, cumin and salt; rub over meat. Place meat in slow cooker. Add cola, broth, onion and garlic. Cover and cook on low for 8-10 hours or until meat is tender. Take meat out and shred, removing meat from bones (discard bones). Return meat to crock pot along with remaining brown sugar and paprika. Cover and cook on low for another hour or until heated through. Meanwhile, in a blender combine mayonnaise, milk, tomatillos, cilantro, jalapeno, salad dressing, lime juice, garlic and cayenne. Cover and mix until well blended. Pour into a bowl and chill until meat is ready. Serve sauce over meat and ENJOY :)

Pork Chili Verde

This meal ended up being a rushed meal eaten on the fly. We were trying to get out family garden ready so I had to run back home to finish it off, eat my share and get the kids ready and take it to them. Everyone seemed to enjoy it though which was good. I love rice but some of my kids aren't the biggest fans, oh well I'm mean and make them eat it anyway ;) One thing I would try next time is to try and make the sauce thicker, well if I wanted to use it in a tortilla like the recipe said to do. It was a yummy recipe though and yet again another crock pot recipe which I love :)
1 boneless pork sirloin roast (3 lbs.), cut into 1-inch cubes
4 med. carrots, sliced
1 med. onion, thinly sliced
1 c. minced fresh cilantro
4 garlic cloves, minced
3 T. canola oil
1 can (28 oz.) green enchilada sauce
2 jalapeno peppers, seeded and chopped
1 T. cornstarch
1/4 c. cold water
Rice
Flour tortillas

In a large skillet, saute pork, carrots, onion, cilantro and garlic in oil in batches until pork is browned. Transfer to a crock pot, add enchilada sauce and jalapenos. Cover and cook on low for 6 hours or until meat is tender. In a small bowl combine cornstarch and water until smooth; stir into pork mixture. Cover and cook on high for 30 minutes or until thickened. I may have not cooked it long enough afterwards thicken it, I would suggest doing that if you want to eat it with tortillas. Yummy Scrummy, ENJOY :)

Thursday, June 9, 2011

Asian Chicken Thighs

Once again another recipe from one of my new cookbooks and this one is DEFINITELY a BIG KEEPER!!! As soon as my husband tried it he said that it needed to go on our regular rotation and I totally agree. There are only a few things I would change about the recipe, one being I would use boneless thighs and the other is I would double the recipe so we could have more chicken for each of us and for leftovers :)
5 boneless chicken thighs, skinned (I'm going to use boneless next time)
5 tsp. olive oil
1/3 c. warm water
1/4 c. brown sugar
2 T. orange juice
2 T. soy sauce
2 T. ketchup
1 T. white vinegar
4 garlic cloves, minced
1/2 tsp. crushed red pepper flakes
1/2 tsp. Chinese five-spice powder

In a large skillet over med. heat, cook chicken in oil for 8-10 minutes on each side until cooked. In a small bowl, whisk warm water, brown sugar, orange juice, soy sauce, ketchup, vinegar, garlic, red pepper and five-spice powder. Pour sauce over chicken and bring to a boil. Reduce heat, simmer uncovered for 30-35 minutes or until chicken is tender, turning occasionally. The recipe said to mix 2 T. of cold water and 2 tsp. of cornstarch together and then add it to the sauce to thicken it but my sauce was already thick enough so I skipped that step. I served this with white rice which was yummy, especially with the sauce drizzled on top.

Eggplant Sausage Casserole

As I quickly looked through one my new cookbooks this meal caught my eye because I'm a HUGE pasta fan, especially things like this. The name of the recipe threw me off a little though because I wasn't seeing any eggplant, plus I had never had any before but I thought it was worth a try because it looked so good. I thought it was ABSOLUTELY DELICIOUS and so did most of my family. I could barely taste the eggplant, I couldn't really even tell you still what eggplant tastes like. My husband said he could taste it and my picky Maddie didn't really like the eggplant (I don't think she could even taste it, I think it was just her knowing it was something different) or the ricotta cheese. This will for sure be something that I make again though, I will probably not add the eggplant, only to please my crazy family because I thought it was YUMMY :) It did make quite a lot though so I think next time I may split it half and freeze one of them.
1 pkg. (16 0z.) penne pasta
2 lbs. Italian sausage
1 med. eggplant, peeled and cubed
1 lg. onion, chopped
2 T. olive oil
2 garlic cloves, minced
1 can (28 oz.) diced tomatoes, undrained
1 can (6 oz.) tomato paste
1 tsp. salt
1 tsp. dried basil
1 tsp. paprika
1 carton (15 oz.) ricotta cheese
4 c. shredded part-skim mozzarella cheese, divided

Cook pasta according to directions. Meanwhile, in a large skillet, cook sausage over med. heat until no longer pink; drain and set aside. In the same skillet, saute the eggplant and onion in olive oil. Add garlic, cook 1 minute longer. Stir in tomatoes, tomato paste, salt, basil and paprika; simmer partially covered for 15 minutes. Remove from heat and add strained pasta and sausage and mix well. Spread half pasta mixture into a 9x13 greased baking dish. Spread with ricotta cheese and then top with half of mozzarella cheese. Add remaining pasta mixture and cover. Bake at 350F for 40 minutes. Uncover, sprinkle with remaining mozzarella cheese. Bake for 5 minutes or until cheese is melted. Let stand for 10 minutes before serving and then ENJOY :)

Wednesday, June 8, 2011

Chicken 'n Stuffing Pot Pie

I grew up having a big Sunday dinner every week and I LOVED it. Now when I go home to England I can't wait for Sundays so I can enjoy the DELICIOUSNESS of my Mom's Sunday dinner. This recipe reminded me of all those yummy things that make Sunday dinner so I had to try it. This was another recipe from one my new cookbooks and it's a crock pot recipe which is always GREAT in my book. Having 5 kids is WONDERFUL but life gets crazy sometimes so it's nice to have meals I can prepare earlier in the day. This meal turned out REALLY good and we all really liked it. It's definitely something I will be making again. Some of my family weren't a fan of the green beans but you don't have to add those, you could leave them out or add a vegetable that your family like better.
8 boneless chicken thighs
6 slices precooked bacon, crumbled
1/2 bag (1 lb. size) baby carrots, cut in half lengthwise (about 2 c.)
4 medium red potatoes, cut into 4th or 8th
1 tsp. dried marjoram leaves
1 jar (12 oz.) chicken gravy
1 bag (12 oz.) frozen green beans, thawed
6 T. butter or margarine, melted
7 oz. herb-seasoned stuffing cubes (about 4 2/3 c.)

Spray crock pot with cooking spray. Place chicken in crock pot and top with bacon, carrots, potatoes, marjoram and gravy. Cover and cook on low for 6-8 hours. Gently stir in thawed green beans to cooked chicken mixture. In a medium bowl mix melted butter and stuffing. Spoon stuffing over chicken mixture. Increase heat setting to high; cover and cook for 15 more minutes and ENJOY :) If you don't have any stuffing cubes you could always make regular stuffing and just add it afterwards or to the crock pot.

Lime Chicken Tacos

Here's another recipe from one of my new cookbooks. I really do LOVE all my new cookbooks, plus they all have pictures which is WONDERFUL. I think I got 6-7 of them and have only really looked through 3 properly. Then the other day I saw another good sale on cookbooks so of course I couldn't pass it up so I ended up buying 4 more cookbooks, I'm terrible, hahaha! Anyway I thought this recipe looked yummy and super easy, plus it's made in a crock pot which is great for me on days when I'm out and about all day. My only issue with cooking chicken in a crock pot is that the chicken always seems to have a funny texture so if you have any good suggestions on how to stop this please let me know :)1 1/2 lbs. boneless skinless chicken breasts
1 T. chili powder
3 T. lime juice
1 c. frozen corn
1 c. chunky salsa
Flour tortillas (6-inch)

Place chicken in crock pot. Combine lime juice and chili powder; pour over chicken. Cook on low for 5-6 hours or until chicken is tender. Remove chicken and let cool for a few minutes. Shred chicken and return to crock pot. Stir in corn and salsa. Cover and cook on low for 30 minutes or until heated through. Serve in tortillas and any topping you like. We used sour cream, lettuce, cheese and tomato's. Using the 6-inch tortillas is great for my kids because they're the perfect size :)

Thursday, June 2, 2011

Fudgy Oat Brownies

I saw this dessert while trying to find a dessert to make this Memorial day and thought it looked delicious. I didn't have any unsweetened chocolate though so I had to wait until I went to the store to get some. I was excited to make this and I did NOT resist trying a piece but I was good and only had one piece and it was indeed YUMMY! I love anything with oatmeal so this was a perfect combination, chocolate and oatmeal :) I also really liked the frosting on this as I'm not a fan of store bought frosting. It was super easy to make too so it will definitely be something I use again in the future. I probably could have waited for this dessert to cool down a little more but I'm not a very patient person so that didn't happen. The only benefit from that would have been that the frosting would have set a little more but I didn't mind the gooeyness :)
1 1/2 c. quick cooking oats
3/4 c. all purpose flour
3/4 c. packed brown sugar
1/4 tsp. baking soda
1/4 tsp. salt
3/4 c. butter, melted
1 pkg. fudge brownie mix (13x9 pan size)

Frosting
3 T. butter
1 1/2 oz. unsweetened chocolate
2 1/4 c powdered sugar
3-4 T. hot water
1 1/2 tsp. vanilla extract

In a large bowl combine oats flour, brown sugar, baking soda and salt. Stir in butter until combined. Press mixture into ungreased 13x9 in. baking pan/dish. Bake at 350F for 10-11 minutes or until puffed and edges are slightly brown. While the oatmeal mixture is cooking prepare brownie mix according to cake-like directions on box. Spread brownie batter over crust. Bake for another 25-30 minutes or until toothpick comes out clean. To make the frosting put butter and chocolate into a microwave safe bowl for around 2 minutes or until melted. Stir until smooth and immediately add powdered sugar, 2 T. hot water and vanilla. Add remaining hot water and stir until smooth (I found that adding 2 more T. of water made the frosting runnier. It wasn't super runny or anything but I think if you just added 1 T. it would have been a little thicker. It really depends how you like it). Immediately spread frosting over brownies. Cool on wire rack until frosting is firm.

I found this recipe in one of my new cookbooks I got for $5, what a great deal they were, I LOVE THESE COOKBOOKS. The only problem is that there's too many things I want to make :)

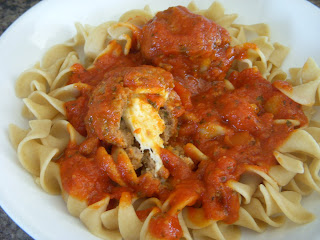
Cheese Stuffed Meatballs

MI've always loved pasta, it's one of my favourite things to eat which is not very good when you're trying to lose weight but oh well, I would NEVER not eat it, I love it too much. Anyway as I was looking through one of my new cookbooks I found this yummy recipe and had to try it. This was a hit with everyone, my only problem was that I think I should have cooked the meatballs a little longer in the oven and in the pan afterwards but we were in a rush and the pasta was cooked. They were fully cooked but I think they could have been more firm, maybe adding more bread crumbs would have helped with that too, I'll try that next time.
4 sticks mozzarella string cheese, cut into 18 cubes
1/2 c. Italian style bread crumbs
1 jar (48 oz.) tomato pasta sauce
1 1/2 lbs. lean ground beef
2 T. finely chopped onion
1/2 tsp. salt
1/2 tsp. dried oregano leaves
1 egg
Pasta (how ever much feeds your family normally and whatever type you like)
2/3 shredded parmesan cheese (or whatever cheese you like)

***Place cheese cubes in a baggie and freeze for at least 1 hour before making this recipe***
Heat oven to 375F. Line a 10x15x1 baking dish with foil and spray with cooking spray. In a large bowl mix bread crumbs and 3 T. of the pasta sauce. Next stir in beef, onions, salt, oregano and egg. I used my hands for this, it just made it a lot easier. Shape mixture into 18 (2-inch) balls. Press 1 cheese cube into each ball, sealing it inside. Place each meatball into baking dish carefully. Bake for 10 minutes. Meanwhile pour remaining pasta sauce into a large pot (it said to use a dutch oven but I don't have one) and simmer over med-high heat, stirring frequently. Once meatballs are cooked, add them to the pasta sauce in the pot and reduce heat to med-low. Cover and simmer for 10 minutes, stirring occasionally until meatballs are thoroughly cooked and no longer pink. Serve with any kind of pasta you like. Serve with cheese if you like and ENJOY :) Anything with cheese is great with me and my family, I think that's why I wanted to try this recipe.

Salsa Chicken Fiesta

When I saw this recipe in one of my new cookbooks I thought it looked delicious and super easy so I had to try it. It was super easy but it wasn't as delicious as I thought it was going to be :( It wasn't bad though, I just need to figure out a way for the crust to not be as dry and a way to give more flavour to the chicken part.
1 1/3 c. bisquick mix
1/4 c. water
2 eggs
2 1/2 c shredded cheddar cheese
6 large boneless chicken breasts, cut into 1/2-inch pieces
1 jar (16 oz.) thick & chunky salsa

Preheat oven to 400F. Spray 9x13 baking dish with cooking spray. In a med. bowl stir bisquick mix, water and eggs. Spread mixture into pan and then sprinkle with 2 c. of cheese. In a skillet cook chicken over med-high heat until no longer pink. Drain juices and add salsa. Heat until hot. Spoon chicken mixture over bisquick mixture within 1/2-inch of edges. Bake for 25-30 minutes or until edges are dark golden brown. Sprinkle with remaining cheese and bake for another 2 minutes or until cheese is melted. This can be served with sour cream and ground red pepper if you like.

Deep-dish Taco Squares

Here's another recipe from one of my new cookbooks. I LOVED this recipe and so did most of my family. Only one of my kids wasn't a fan but I think that was because of the sour cream, she's not really a sour cream fan. Anyway this was super easy to put together and REALLY yummy.
1/2 lb. lean ground beef
1/4 c. chopped onion
2 T. taco seasoning mix
1 c. bisquick mix
1/4 c. cold water
1/2 c. sour cream
1/3 c. mayonnaise
1/2 c. shredded cheddar cheese
1 med. tomato, chopped
1 (4.5 oz.) can chopped green chiles

Preheat oven to 375F. Spray 8-inch square baking dish with cooking spray. Over med-high heat cook ground beef and onions until thoroughly cooked. Drain and then stir taco seasoning into beef mixture until blended. In a med. bowl stir bisquick and water together until it forms a soft dough. Put dough mixture into the square dish and pat down so it's evenly spread and about 1/2 inch up the sides. In a med. bowl mix sour cream, mayonnaise and cheese until blended. Layer beef mixture, tomato and chiles over dough. Spoon sour cream mixture over the top. Bake for 25-30 minutes or until edges of dough are light golden brown.

Monster Cupcakes

My daughter turned 8 in April and she wanted to have a monster themed party. Due to family craziness we opted for an easy party going bowling but we still tried to make it monster themed as much as we could. I made monster feet for the kids to wear and I made these cute monster cupcakes. To make them even more fun I used a recipe for rainbow cupcakes that I found here. I love this blog, I've used TONS of her recipes but all before I started this blog so one day I will blog more about them and try and get pictures when I try them again. These cupcakes were a HUGE hit and were sooo easy to put together. I think the rainbow cupcake idea is FANTASTIC and it can be used for any design you want to use.
1 white cake mix
2 eggs
1 c. sour cream
1/2 c. milk
1/3 c. vegetable oil
Food colouring

Mix ingredients together for about 30 seconds. Scrape around the sides of the bowl and then beat on med-high speed for 3 minutes. Divide batter into small bowls (the amount of bowls you need depends on how many colours you choose to use, I used 5). Add desired food coloring to each bowl of batter. Once you have all your batter ready spoon around 1 T. of the first colour into each of your cupcake papers. The batter is thick so to spread it out I used this great tip that I got from here again. You get a little bowl of water and each time you need to spread out the batter you dip your finger in the water and then gently spread the batter out. After you have done the first colour of batter, repeat this step with each colour you have chosen. Bake according to packaged cake directions or until toothpick comes out clean. This recipe makes around 15-16 cupcakes. These cupcakes are nice and moist to which is always nice :)

Taco Casserole

I made this a while ago but I'm still trying to catch up. This recipe is from our school cookbook but is also one of my really good friends recipe, thanks Susan :) My family really enjoyed this dinner, I especially did. I really love Mexican food, I never thought I would say that but that's due to really never trying any when I was younger. This picture doesn't actually give this meal justice because it was super good and really easy to make aswell.
2 lbs. hamburger
1/2 onion, chopped
2 (10 3/4 oz.) cans cream of mushroom soup
10-12 (6-inch) corn tortillas
1/2 can diced green chilies
1/2 pkg. taco mix
grated cheese (about 2 c.)

Brown hamburger with chopped onions. Drain grease and add chilies, soup and taco mix. Layer in a casserole dish, start with quartered tortillas, then hamburger mixture, then cheese and repeat. Bake for 20 minutes at 350F. Serve with grated cheese, tomatoes, lettuce and sour cream (whatever you like).

Southwest Crockpot Burritos

This recipe is from our school cookbook and because I've been loving Mexican food lately I wanted to try this one. I was a little disappointed only because in my mind I thought it was going to be this fantastic recipe. It was still really good but I think it needed something a little extra. I did like the refried beans with it though, that was yummy :)
2 lbs. boneless chuck roast
1 jalapeno pepper, seeded and chopped
2 cloves garlic, crushed
1 tsp. beef bouillon granules
1 med. onion, chopped
1/2 tsp. chili powder
1/2 tsp. cumin
2 1/2 T. fresh cilantro, chopped
1/2 tsp. salt
1 c. water
8 large tortillas
Refried beans
Shredded cheese

Place roast, pepper, garlic, beef bouillon, onion, chili powder, cumin, cilantro, salt and water into a crockpot. Cook on low for 8-9 hours until tender. Remove meat and shred, then place in a bowl. Combine meat with 1 c. of cooking juices. Spread tortillas with cooked refried beans, add beef and sprinkle with cheese. You could really serve this however you like so enjoy :)

Cream Filled Cupcakes

These cupcakes were great because there was NO frosting needed. Not that I don't like frosting, I'm just really picky about it. I'm not the biggest fan of store bought frosting so I don't really eat cake all that often. This recipe was pretty easy, the only problem I had was that the filling kind of went to the bottom of the paper so they weren't that easy to get out. That didn't stop any of us from enjoying them though. My husbands co-workers all really likes these too. After I make goodies I normally send the left overs to work with my husband, they love it :)
1 pkg. chocolate cake mix
1/2 c. sugar
1 c. chocolate chips
1 (8 oz.) pkg. cream cheese (at room temp.)
1 egg
dash of salt

Mix cake mixture as directed on the package. Fill cupcake liners 2/3 full. Blend sugar, cream cheese, egg and salt together. Add chocolate chips to cream cheese mixture. Drop by teaspoonful into center of each cupcake (batter). Bake at 350F for 20 minutes (until toothpick comes out clean). Remember no need for frosting :)

Tuesday, May 24, 2011

Hawaiian Pork Ribs

Tonight's recipe was DELICIOUS!!!

I found this recipe in my new Betty Crocker cookbook and it looked so good I had to try it. I also knew my husband would love it because he LOVES meat and especially ribs. This was a pretty easy recipe to make as well which is always good. The recipe called for 6lbs pork loin back ribs but I didn't write that down properly so I ended up not knowing what to get when I was at the store. I ended up picked out country style boneless ribs and I only used 3lbs and I actually am glad I did. I think for our family that worked better. Really I think you could use any kind of meat you want. We all LOVED the ribs though, it was a big hit which is always nice when you're trying new things.
3 lbs boneless country style ribs (anything you like really)
3/4 c. ketchup
3/4 c. pineapple preserves
1/2 c. teriyaki marinade and sauce
2 T. packed brown sugar
2 cloves garlic, finely chopped
1/2 c. cornstarch
1 (20 oz.) can pineapple chunks in juice, drained, with 1/3 c. juice reserved
1 (1lb) bag frozen stir fry (any kind you prefer)

Spray crock pot with cooking spray, then place ribs in. In a small bowl combine ketchup, preserves, teriyaki, brown sugar and garlic. Pour mixture over ribs. Cover and cook on low for 6-7 hours. Remove ribs from cooker and keep warm. I just put mine in the oven set at 200F. In a small bowl combine cornstarch and pineapple juice until smooth. Add mixture to the juice in the crock pot. Increase heat to high, cover and cook for another 25 minutes (or until thickened). Meanwhile mix pineapple chunks and stir fry veggies in a microwave safe bowl. Cook uncovered for about 5-6 minutes (until heated/cooked). Drain water from veggies then mix veggies in with the sauce that is in the crockpot. I serves this with rice and served the veggie mixture over the ribs. I also had some veggie/sauce mixture left over so I put it in a quart size freezer bag and I'm going to freeze it so I can use it another day. I figure if I need a quick dinner one night I can cook some chicken really fast and just add the leftover sauce, YUMMY!!!

I'M BACK!!!

Well, it's been a while since I last posted anything but I'm finally back and glad to be :) I had been so excited to start this blog but life took some unexpected turns which in turn made my life a little crazy. This past month and a half has been a little hard and I've felt like I haven't been myself. This past week and half I finally feel like life is getting back to normal, well whatever normal for me is :) Anyway I'm just glad to be feeling like me again and I'm excited to get back to cooking again.

About a month or so ago I ordered 7 new cookbooks, hahaha! They were all $5 each so I couldn't resist. Anyway this week I finally got round to checking them out and the excitement for cooking came flooding back. I made a list of things I thought looked good (the list was BIG) and hit the grocery store. Hopefully I'll get caught up soon and hopefully life will continue to get better. Life really is crazy sometimes, you never know what's going to happen. I'm just thankful for my testimony and the knowledge I have that families are forever. Anyway I hope you enjoy my next couple of entries, I especially enjoyed tonight's dinner, it was YUMMY!

Wednesday, March 30, 2011

Italian Chicken & Potatoes

Yesterday when I went to the store I forgot my shopping list which was not good. I managed to remember most things but forgot a couple of things so I wasn't able to make one of the dinners I had been planning. So, I decided I was time to try and make my own dish up and it was GREAT :) What I came up with was basically the same a recipe my family LOVE but I put my own twist to it. The other recipe uses the crock put and just chicken but I didn't want to use the crock pot and I wanted to use up some of the potatoes we had. I think it turned out really well, well apart from the fact it overflowed all over my oven, whoops ;) Anyway I think this will become a family staple, now I just can't wait for Steve to get home so he can try it too, I think he's going to LOVE it, YUMMY!!!3 chicken breasts cut into strips
1 lb. butter gold potatoes, cubed (you could use any kind of potatoes, these are what I had)
1 (8 oz.) box cream cheese (I used neufchatel cheese because it's less fat)
1 (10 3/4 oz.) can cream of mushroom soup
1 c. milk
1 pkg. dry Italian dressing

Preheat oven to 375F. Put chicken and potatoes in a 9x13 dish chicken and potatoes. Combine all other ingredients and mix until combined well. Pour soup mixture over chicken and potatoes. Cover dish with foil and bake for around 1 1/2 hours. I had the oven set at 400F which made the soup mixture bubble too much and go everywhere. I took the foil off for the last 10 minutes but you don't really need to do that. I mainly did that so it would stop bubbling everywhere, hahaha! I served this with TONS of vegetables which I LOVE, enjoy :)

This recipe had about 1715 calories in it the way I made it which isn't too bad I don't think. It was 286 calories for 1 serving (when you divide it by 6).

Tuesday, March 29, 2011

Banana/Strawberry/White Chocolate Chip Bread

One of my favourite desserts is banana bread. The other day I came across this recipe so I had to try it because it looked so DELICIOUS :) The recipe called for raspberries but I didn't have any so I used strawberries instead, I think you could really use a variety of berries and it would taste great.
(This picture was taken a while after I made this bread so the strawberries were a little soggy)
1 c. flour
1 c. whole wheat flour
2/3 c. white sugar
1 T. baking powder
1/2 tsp. baking soda
1/2 tsp. salt
2 eggs
2 ripe bananas, mashed
1/4 c. vanilla yogurt
1/4 c. canola oil
1 tsp. vanilla
1 c. fresh raspberries (I used strawberries which I cut into small pieces)
3/4 c. white chocolate chips

Preheat oven to 350F. Spray loaf pan with cooking spray (I used 3 mini loaf pans). In a bowl combine the flours, sugar, baking powder, baking soda, and salt. In another bowl, mix the eggs, bananas, vanilla yogurt, oil, and vanilla until well combined. Slowly add the flour mixture to the wet mixture until well blended. Fold in white chocolate chips then add most of the raspberries (I used strawberries) and fold them gently into the mixture as well. Pour the batter into the loaf pan then push the remaining raspberries (strawberries) into the top of the loaf. Bake in the oven for 55-60 minutes (It only took 45 minutes for the mini loaves) or until a tester comes out of the center clean. Let the bread cool and ENJOY :)

I think next time I make this recipe I will try another kind of berry and maybe not use the brown flour. I really like brown flour but I think my husband prefers just the white. I maybe even just use this idea with my usual banana bread recipe too and see how that turns out.

Sweet and Sour Meatballs

I've been meaning to make this recipe for a couple of weeks and finally got round to it tonight. It was WAY easier than I thought it was going to be as well which was nice. Even though I'm loving trying to recipes sometimes I get put off when the recipe seems like it's a lot of work. The thing that kept putting me off this recipe was making the meatballs, I don't know why. Anyway they were SOOO easy and it was fun doing something I had never done before. This is another recipe from the school cookbook, it was submitted by Shari Bruce. My kids LOVED the meatballs but really aren't fans of rice. They ate the meatballs SUPER fast but it took them a while to eat the rice but I'm a mean Mom and I make them eat everything. I thought it was REALLY yummy too but it was quite high in calories, luckily I hadn't eaten tons during the day so I had enough calories to spare. The whole meal was 2308 calories. I made 24 meatballs so I just divided the calorie amount by that and just multiplied that number by how many meatballs I ate so I guess the meal could have been less but I was hungry :) You'll have to add the rice too, I used brown rice so for 1/2 c. it was 150 calories.
1 1/2 lb. raw hamburger
1 beaten egg
1/2 c. milk
1/2 tsp. salt
1/4 tsp. pepper
dash of garlic salt
dash of onion salt
dash of nutmeg
2 slices of bread (I used 3 slices of whole wheat bread)

Mix ingredients together and form into balls (I made 24 meatballs, they were a good size). Bake meatballs for 20 minutes at 350F. Drain well.

1 15 oz. can pineapple tidbits, drain and reserve liquid (I used a 20 oz. can)
1/2 c. chopped green pepper
1/2 c. sugar
1/2 tsp. salt
2 T. cornstarch
1/4 c. vinegar
1 c. reserved pineapple juice and water (I just used all the reserved juice)
2 tsp. beef bouillon granules
2 T. soy sauce

On top of stove, combine cornstarch, bouillon, vinegar, sugar, salt, soy sauce and pineapple juice. Cook until bubbly and thickened. Add green pepper and pineapple tidbits. Add meatballs to pineapple mixture and stir gently until all meatballs are coated. Simmer for 15 minutes. Serve over rice. Freezes well so you could double the recipe and freeze half for another day. To freeze put meatballs into a freezer bag and pour cooled sauce over meatballs. When ready to use thaw and simmer for 15 minutes.

Thursday, March 24, 2011

Chicken/Pasta/Chicken Casserole

I have been so good at making new recipes lately but today I wasn't in the mood so I decided to make one of my old faithful recipes :) A few years back my mother in law put this recipe together and ever since then this has been one of our family favourites, it's SUPER YUMMY and very easy :)
3-4 cooked chicken breasts, cubed or shredded
1 (12 oz.) bag wide pasta ribbons (I used whole wheat pasta tonight)
1 (26 oz.) can cream of chicken soup
1 c. sour cream (I used fat free)
2 c. frozen mixed vegetables (you could use any or none at all)
1 c. grated cheese (as much as you like depending on how cheesy you want it. I didn't use any today)
1 box chicken stuffing, prepared

Preheat oven to 400F. Start cooking pasta (I usually have already cooked the chicken before or at the same time as cooking the pasta). Mix together soup, sour cream, vegetables and grated cheese. Once pasta is cooked add that and the chicken to the soup mixture. Place mixture into a 9x13 dish and cover with stuffing evenly (I used 2, 8x8 dishes tonight so I could freeze one for another day). Cover with foil and bake for around 40-45 minutes. Take foil off and cook for another 5-10 minutes, or until stuffing starts to brown.

For this whole recipe there was 3480 calories. That doesn't include cheese though, that would make it more. Also if you used regular pasta it would be more too but not by too much. I think this recipe makes about 12 servings or more depending on how much you eat.

Monster Cookies

Today I was in the mood to make cookies so I decided to make one of my old faithful recipes that I used to make ALL the time. These cookies are my daughters favourite cookies so I knew she would be excited when she got home. As soon as she walked through the door after school she said she could smell cookies, then she ate about 10 of them and wanted more. She's so mini but can eat TONS, I wish I could do that ;) This recipe came from a cookbook my ward put together a few years back, it was submitted by Heather Carter (thanks Heather, we LOVE this recipe). I used to use a medium size scoop to make these cookies but today used my new small one and I think it was better. I was able to make 7 dozen cookies with this recipe so I had plenty to take to neighbours which we always like to do :)1 c. light brown sugar
1 c. sugar
3 eggs
1/2 c. margarine
1/2 T. light corn syrup
1/2 tsp. vanilla
2 tsp. baking soda
1/4 tsp. salt
1 1/2 c peanut butter
1 c. mini M&M's
1 c. mini semi sweet chocolate chips
4 1/2 c. quick oats

Cream together brown sugar, sugar, eggs and margarine. Add corn syrup, vanilla, baking soda, salt and mix well. Add peanut butter (I use the measure all cup for this which I think is GREAT) and mix well again. Stir in M&M's, chocolate chips and quick oats. Spoon onto cookie sheet and bake at 350F for 8-10 minutes (cook time is 4-5 minutes longer when you use the medium scoop).

You could use ANY kind of chocolate chips you have for this recipe. Maybe these will become one of your family favourites too, ENJOY :)

Wednesday, March 23, 2011

Chicken Fettuccine Alfredo

I've been meaning to make this meal for the past couple of weeks and tonight I finally got round to it. It was super easy to make which is always good. I was just a little frazzled while making it because Steve wasn't home, Austin was awake and not too happy because he had missed a nap, my other kids were all over the place and Maddie was meant to be home so she could go to volleyball but she was off with her friend cleaning out window wells for money ;) Luckily I have a WONDERFUL neighbour who went to find Maddie for me, thanks :) Anyway this meal turned out good, I wish it had been a little more cheesier, our family LOVE cheese! The good thing about this though was that it wasn't as grainy as other alfredo sauces I've made in the past. I think the next time I try and make an alfredo sauce I will just try adding more cheese to this recipe. This recipe was from the school cookbook again, it was submitted by Judy Ritter.
3/4 lb. fettuccine noodles
1/4 c. butter
2/3 c. heavy cream
2/3 c. grated parmesan cheese
2 c. cooked chicken, cubed (I just grilled chicken breasts and sliced them)
salt and pepper to taste
ground nutmeg (I didn't use this)

When pasta is almost done cooking, melt butter in a saucepan. Add cream and 1/3 c. of the parmesan cheese. Simmer over very low heat for 4-5 minutes until sauce starts to thicken. The recipe said to put the pasta in a dish, place chicken and desired vegetables on top and then pour alfredo sauce over everything. Then it says to sprinkle with remaining cheese, nutmeg, salt and pepper. Instead I just mixed the alfredo sauce with the pasta and served it that way. Then I put the chicken and vegetables on the side. We had broccoli and corn as our vegetables, I always have LOTS of veggies and not as much of the main dish. I figured out the calories for the noodles and sauce, for the whole dish it was 2200 (then divide it by however much you have).

Sunday, March 20, 2011

Layer of Love Chocolate Brownies

Before I write anything else about this dessert I want to let you know that these brownies are SUPER rich but also VERY good, hence I ate about 4 pieces, NOT GOOD!

This has been something I have wanted to make ever since I found this blog, Cupcake Diaries and I finally got round to making them for Sunday dinner. I ended up doubling the recipe because we were having a big family dinner. This recipe originally came from Very Best Baking which is now another site I really like. I think the next time I try this recipe I won't add quite as much cocoa and maybe not as much caramel either. This is one of the main things I'm loving about cooking, figuring out what I can do next time to make the recipes I try suit my family better next time or just be able to make my own recipe from the recipes I try, it's GREAT :)3/4 c. flour
3/4 c. baking cocoa
1/4 tsp. salt
1/2 c. butter, cut in pieces (I used margarine)
1/2 c. sugar
1/2 c. packed brown sugar
3 eggs, divided
2 tsp. vanilla extract
1 c. chopped pecans (I didn't use these)
3/4 c. white chocolate chips
1/2 c. caramel ice cream topping
3/4 c. semi-sweet chocolate chips

Preheat oven to 350 F. Grease an 8x8 square baking pan, (I used a 9x13 dish when I doubled the recipe). Combine flour, cocoa, and salt in a small bowl and set aside. Beat butter, sugar, and brown sugar until creamy. Add 2 eggs one at a time, beating well after each one. Add vanilla extract and mix well. Gradually beat in the flour mixture. Take aside 3/4 c. of the batter. Spread the rest of the batter into the greased baking pan. Sprinkle the nuts and white morsels over the batter in the pan. Then drizzle the caramel over the top of that. Beat remaining egg into the batter set aside until the batter is light in color. Stir in the semi-sweet chocolate chips. Spread evenly over the caramel layer. Bake for 30 to 35 minutes or until the center is set (longer if doubling the recipe, I cooked it for a little too long though). Cool completely and cut into bars.

Wednesday, March 16, 2011

Russian Chicken

Does this look familiar??? As I was making this I thought , this looks a lot like the sticky chicken I made last week. I had never used Russian dressing before so I wasn't sure how this was going to taste but it sure looked the same. I didn't have to flour and brown the chicken with this recipe but I don't think you have to with the sticky chicken either. Anyway once we tried this it did actually taste different. It has more of a sweet and sour flavour which I really like. Something I'm really starting to love about cooking though is how I'm learning things I can try next time I make something like this. Maybe trying a totally different sauce to change the flavour or adding fruit and other things to make it a true sweet and sour dish. Anyway I really liked this recipe and what made it even better was that it was SOOO easy to put together, great for a Mom of 5 kids and that's something REALLY important for me.
1 bottle of Russian dressing
1 jar of apricot preserves
1 packet of Lipton onion soup mix (I used the store brand)
5-6 chicken breasts

Put chicken pieces into a 9x13 baking dish (I cut my pieces of chicken in half). Mix dressing, apricot preserves and onion soup mix together. Pour mixture over the chicken. Bake at 350F for 1 hour. Serve over rice (I've been using instant brown rice which is 150 calories for 1/2 cup). There is 3220 calories in this recipe. I divided it by 8 so each serving was 402.5 calories (most of the calories actually come from the sauce so if you don't have very much of the sauce it would be less calories). This recipe is from the school cookbook again and was provided by one of my good friends Andrae Seward.

Tuesday, March 15, 2011

Oatmeal Bars

Why oh why do I love to make dessert so much??? It's really not a good thing, especially since I'm still trying to lose weight. I love cooking other things too but every time I look through recipes I'm always drawn to dessert recipes, all that chocolate/sweet goodness is just sooo tempting and delicious :) I REALLY love cookies that have oatmeal in them, my biggest love is oatmeal cookies with chocolate raisins, YUMMY!!! Anyway I found this recipe in the "Patchwork of Friends" cookbook I just got. It sounded so yummy I couldn't resist. They ended up tasting pretty good, a little gooey but good. I think I might change up the chocolate part next time I make these (maybe so it's like the chocolate marshmallow filling from the S'Mores Galore recipe) but I like the idea of this dessert.

2 c. brown sugar
1 c. butter (I used margarine)
2 eggs
1 T. vanilla
1 tsp. baking powder
1/2 tsp. salt
2 c. flour
3 c. oats (I used quick oats)
1 c. (12 oz.) milk chocolate chips (I used semi sweet because it's what I had)
2 T. butter (I used margarine)

Combine all ingredients except chocolate chips and 2 T. butter. Press 2/3 of the mixture into a 9x13 cookie sheet. Combine and melt remaining ingredients in microwave for around 1 minute. Spread chocolate over oatmeal mixture evenly. In clumps put remaining oatmeal mixture on top of chocolate mixture. Bake at 350F for around 15-20 minutes (I baked them for about 25 minutes). Let cool and set before cutting and serving.

Chicken and Wild Rice Soup

Besides desserts and a few other things, one of my most favourite things to eat are soups. I came across this soup a few weeks ago and have excited to try it. I think wild rice is super good so this soup combined a lot of food I like. It seemed like most of my kids liked this meal too, I did have to pick the beans out for one of my daughters but other than that it was a success :) This recipe came from one of the new blogs I found. She has a really good dessert I want to try too, I have all the ingredients to make it but haven't. I should have made it this past weekend when I was eating too much, dang it ;)

1 c. chicken or turkey (shredded or cubed)
1 T. chicken base
(or 2 cubes)
2 (10.5 oz.) cans cream of chicken soup
5 2/3 c. water
1 small box Uncle Ben's long wild rice
(and seasoning packet)
1 small bag frozen mixed vegetables
(any kind you like or none if you would prefer)

In a large pot combine water, chicken base, and wild rice. Bring to a boil. After it starts to boil, reduce the heat and cover to cook the rice (following time recommendations on the box). Add the vegetables and cook for another 10 minutes. Add the soup and the chicken. Stir until everything is heated. This recipe has 1540 calories in it which isn't very much. It could probably serve around 8 people which makes it 210 calories per serving, not bad :)

Monday, March 14, 2011

Pumkin Pie Crunch

Tonight I had every intentions of making a new recipe but I didn't have one of the ingredients so I just made fajitas instead, super easy. Earlier I had been trying to clean the fridge out because tomorrow I'm going to the store and I needed more space. I had some pumpkin that I had used to make a dessert last week so I thought I would just make some pumpkin cookies but then I found some evaporated milk so I didn't want to waste that. My friend Leanna told me about a cookbook her Mom and friends had put together so I bought one from her. It's a pretty big cookbook so I knew there would be something in there. I found this dessert which was perfect :) I knew I loved desserts like this so I was excited. The only bad thing about making this dessert was that it made a bunch and after eating WAY too much this past weekend I wasn't going to have any. Plus it's a hard one to share with neighbours. I did take some over to my neighbour though and let them just dish some out. I did end up having a little though because Hadley didn't want any, it was YUMMY!
1 (16 oz.) can pumpkin
1 (12 oz.) can evaporated milk
3 eggs
1 1/2 c. sugar
4 tsp. pumpkin pie spice
1/2 tsp. salt
1 yellow cake mix
1 c. melted butter (I used margarine)
Whipped topping

Mix together pumpkin, milk, eggs, sugar, pumpkin pie spice and salt. Pour into a 9x13 baking dish/pan. Sprinkle dry cake mix over pumpkin mixture. Evenly drizzle melted butter/margarine over dry cake mix. Bake at 350F for 50-55 minutes or until golden brown. (The recipe I used called for 1 c. of pecans which you add 10 minutes before the end of the cooking time but I didn't think my kids would like those so I didn't add them). Coll completely and serve with whipped topping. Refrigerate any leftovers.
Recipe from "Patchwork of friends quilt club, cookbook 2010"

Friday, March 11, 2011

Sticky Chicken

We eat LOTS of chicken in our family. My husband prefers red meat I think but really he just REALLY loves meat :) Tonight I decided to try another recipe from the school cookbook. See, if you haven't got one you need too get one, there's LOTS of YUMMY recipes. This recipe came from one my really good friends, Susan Bingham who always seems to have great recipes. I LOVED this dinner but because I'm still trying to lose weight I only had a small portion. I REALLY wanted more but I had to resist. My kids and Steve both asked for seconds which is a good sign. This will definitely be something I make again, DELICIOUS!

1 c. catalina salad dressing (I used the fat free kind)
1 c. brown sugar
1 pkg. Lipton Onion soup mix (I used the store brand)
6-8 chicken breasts (I used 8)
flourPreheat oven to 325 F. Combine salad dressing, sugar and soup in a bowl. If chicken breasts are thick, cut in half lengthwise. Dip chicken in flour and brown in skillet. Put chicken in a 9x13 dish that has been lined with foil. Pour dressing mixture over chicken, cover and bake for 1 1/2 hours. Serve sauce from chicken over rice. This recipe was about 2265 calories altogether.

Banana Bread

So I REALLY LOVE banana bread, it's one of my favourite desserts, probably because I love bread in general. I have a recipe that I use all the time and it tastes pretty good and all the guys at Steve's office seem to love it. The last couple of times I've made it I have added a little cinnamon in there but Steve wasn't a fan, I was though. I tried a new recipe the other day, this one called for chocolate chips on the top which my kids thought was GREAT! I think they loved it just because of that. Steve thought it was ok but still preferred the other one I made. Today I thought I would try another recipe, this one is from the school cookbook and is of my friends recipe's. I made 4 small loaves and one bigger loaf. I added cinnamon to the bigger loaf and I added chocolate chips to the top of 2 of the small loaves and half of the big one. Crazy I know but I wanted to see what we liked best.
1 c. butter (once again I used margarine because I'm cheap)
2 c. sugar
2 tsp. vanilla
2 tsp. lemon juice
4 eggs
2 c. mashed bananas (approx. 3)
1 c. sour cream
3 1/2 c. flour
1 tsp. salt
2 tsp. baking soda
2 tsp. baking powder
1 c. nuts, optional (I didn't add these. I love nuts but Steve isn't a fan)
*I added about 1 tsp. cinnamon to about 1/3 of the mixture

Cream together butter, sugar, vanilla, lemon juice, eggs, bananas and sour cream. Mix in flour, salt, baking soda, baking powder and nuts. Pour into 3 separate greased loaf pans (I used 4 mini loaf pans and 1 bigger pan). Bake at 350F for 35-55 minutes, depending on loaf size. *Recipe provided by Angie Tamayo*

This bread is SUPER moist and REALLY delicious, I think I might have found a new banana bread recipe, YUMMY!

Thursday, March 10, 2011

Ooey Gooies

So tonight for dinner I made another recipe from the school cookbook and once again it was YUMMY! Another thing I wasn't the biggest fan of when we got married was Mexican food and once again it was because I hadn't really eaten it very much or I hadn't eaten very good Mexican food. I now LOVE eating Mexican food, one of my favourite places to go eat is Cafe Rio and I always get their pork, can you say DELICIOUS :) Most of my family liked this meal tonight but I always make my kids eat everything they take or I give them. I think it's good for them to try EVERYTHING! Of course I know there are things that they don't like but I also think they need to try new things at least once. Anyway here's the recipe, this one was brought to you by Macy Sautter (hahaha, I feel like I'm on Sesame Street).

3 chicken breasts (I used 5 because we like meat at our house)
1 (10.5 oz.) can cream of mushroom soup
1 (10.5 oz.) can cream of chicken soup
1 c. salsa
1 (4 oz.) can diced green chilies
1 (15 oz.) can black beans, drained and rinsed
1 tsp. ground cumin
1 tsp. chili powder
1/4 tsp. pepper
1 1/2 c. shredded monterey jack cheese

Put frozen or non-frozen chicken breasts in a crock pot. Mix together soups, salsa, green chilies, beans and spices and pour over chicken. Cook on low for 6 hours. After 6 hours shred chicken and add cheese and cook for another 30 minutes. Serve in a tortilla like a taco. This meal is about 2105 calories altogether (it was 2265 for me because I added more chicken). Then just divide that by however much you eat and ENJOY!

Instead of using tortilla's for my kids like the recipe called for I put it in a bowl and let them use fritos to scoop it out and they liked that. I used a tortilla and added salad, you could also add rice as well or anything you like. It was thinner than I thought it would be so I think just served over rice would be great too. My friend said she doubled the recipe and froze half of it for another day. We had a Relief Society meeting about freezer meals last month so I will doing that with some of these recipes and will hopefully learn as I go along and will share my tips or disasters with you as I go :)

S'Mores Galore

Since I talked about my downfall and consumption of WAY too many of these desserts I thought I would share this recipe with you all. I'm not sure when I'll make these again because they really were that good and I don't know how I'll be able to resist. This recipe is from Pampered Chef, the Delightful Desserts book, I don't think you can still get it. Anyway one of my best friends, Kristy sells Pampered Chef which has resulted in me purchasing LOTS of wonderful gadgets, cookbooks and all in all great products. She has a monthly deal via email that she does which is great, she adds recipes, along with other information on it as well. If any of you are interested in getting on her mailing list or hosting a party let me know. Anyway I remember when I ordered this cookbook, she had a copy of it at a party I was hosting and as I turned every page I couldn't believe how YUMMY everything looked. This dessert was SUPER EASY to make and was SERISOULY DELICIOUS so enjoy!

20 whole honey graham crackers, divided
6 bars (1.55 oz.) milk chocolate candy, coarsely shopped
1 package (16 oz.) miniature marshmallows, divided
6 T. butter or margarine, divided
3 T. milk

I WILL ADD A PICTURE WHEN I MAKE THESE AGAIN!

Preheat oven to 350F. Arrange a single layer of graham crackers to completely cover the bottom of a 10x15.5 bar pan breaking crackers to fit (I used the Pampered Chef large bar pan but you could use anything, I do LOVE the stoneware though). Toast in the oven for 2 minutes.

Coarsely break remaining graham crackers into a large bowl and set aside. Coarsely chop all of the chocolate bars and set aside (I used the Pampered Chef food chopper for this and it worked GREAT).

In a microwave safe bowl combine 3 cups of the marshmallows, 3 T. of the butter and the milk. Heat on high for 1 minute. Stir until smooth and then add half of the chopped chocolate. Stir until chocolate is all melted. Spread mixture evenly over graham crackers in pan.

Melt remaining 3 T. butter; toss with remaining graham crackers. Add remaining marshmallows and chopped chocolate; toss lightly. Spoon mixture over the mixture in pan evenly. Bake for 8-10 minutes or until marshmallows are lightly browned. Let cool and ENJOY :)

You could use even try using the strawberry or the cinnamon marshmellows you can get. I think maybe I'll try the cinnamon ones next time. This recipes makes 24 bars and each one is 200 calories. Now you can see why it was a problem that I ate about 10 of these, whoops ;)

Counting Calories!

Since around the beginning of October I have REALLY been watching what I have been eating and have been exercising 5-6 times a week. I had LOTS of lovely baby weight to lose and at first it came off pretty easily which was wonderful. My friend put 2 biggest loser competitions together which helped me TONS, I actually ended up winning both of them which I didn't think I would but it was fun. Anyway during the 2nd competition I kind of hit a rut which I had done a couple of times but this time it didn't ever go away. I talked about it on facebook which resulted in my cousin telling my about this cool website called loseit.com which I now LOVE!!! It's a website that counts your calories. I had been eating pretty well but I was eating too much of the good things, especially nuts. Since then I've been losing weight again, well until last week when I kind of went NUTS and ate SOOO much JUNK food it was unreal! It was the end of the 2nd biggest loser, then my friends birthday (I made these s'mores bars that were SOOO good, I think I ate about 10 pieces), cheese cake for my sister in laws birthday, goodies I made, English chocolate I had saved, then my nephews Tongan luncheon for his baptism and then the left over yummy pudding salad my sister in law makes, it was NOT GOOD!!! I gained about 7lbs in 1 weeks, how sad! Thankfully this week I'm back on track and have got back down to where I was, phew :)

Anyway enough of my woffling (I tend to go on and on and on, hahaha). The reason I actually wrote this post was because I wanted to say that I have been figuring out the calories to a lot of the things I have been making. I get as close as I can so when I do this I will add it to the recipes in case anyone is interested :) I don't think you should live your life eating just salad and not enjoying food. For example last night we went to Panda Express for dinner and I knew I wanted to eat their because I LOVE their food. I made sure I figured out what I was going to eat there so I would know how many calories I could eat the rest of the day. I think counting calories is a lot like using weight watchers points. Also on that website you can add when you exercise and it will give you more calories to eat, much like weight watchers as well. The website I use has LOTS of different restaurants and different brands of food so you can easily find out the calories. I also search on the internet if I can't find it on there and then I can make my own meal up and add it on loseit, it's GREAT!

Tuesday, March 8, 2011

Beef Noodle Bowl

As I mentioned before I LOVE cookbooks/blogs etc... Well these past few months we put together a cookbook for our kids Elementary school. I have a similar cookbook that my ward put together a few years ago and I use it all the time. The other night I went through our new Discovery Elementary cookbook and wrote down LOTS of recipes I wanted to try. Tonight I made my first recipe out of the school cookbook and it was YUMMY! Our family love pasta and vegetables and my husband LOVES meat so this was a perfect meal for us. This was a really fast meal to make and super easy, I will for sure be making this again :)

8 oz. linguine, uncooked
3 c. broccoli florets
3 med. carrots, peeled and sliced
2 tsp. veg oil
1 lb. beef sirloin steak, cut into thin strips
1/2 onion, cut up
1/4 c. zesty Italian dressing
1/4 c. teriyaki sauce
1 tsp. ground ginger

Cook pasta as directed on package, adding broccoli and carrots for the last 2 minutes of the pasta cooking time. Drain mixture. Meanwhile, heat oil in a large skillet. Add meat and onions, cooking until meat is browned on all sides. Stir in dressing, teriyaki sauce and ginger, cooking until sauce thickens. Toss pasta into the meat mixture and serve.

*You could use any vegetables you like and as much or as little meat as you want. I think next time I will change the meat to chicken (which would be WAY cheaper), pork or you could use whatever meat you like.

This recipe was submitted by Shari Bruce. If you're interested in getting a cookbook they're only $15 and are available at the school, it's full of DELICIOUS recipes.

Pumpkin Blondies

When Steve and I first got married there were LOTS of different kinds of food that I said I didn't like. There are some that I haven't changed my mind on, like mushrooms and root beer. One of the things I said I didn't like was pumpkin. That is now no longer true because I now LOVE pumpkin pie, cookies, cake, anything pumpkin :) It's funny how you can think you don't like something, hence the reason I tell my kids they have to try something before they say they don't like it. Anyway I found this SUPER YUMMY recipe on a The Girl Who Ate Everything and have made it a bunch of times already. It's really easy and fulfils my love for both chocolate and pumpkin. I did change this recipe up a little though by adding semi sweet chocolate chips instead of butterscotch chips. I have made it with those too and they're still delicious but I prefer it with the chocolate (my husband loves the butterscotch flavour), I LOVE CHOCOLATE!

2 cups all-purpose flour
1 T. pumpkin pie spice
1 tsp. baking soda
¾ tsp. salt
1 cup (2 sticks) unsalted butter, at room temperature *I used margarine because I'm cheap*
1¼ cups brown sugar
1 large egg
2 tsp. vanilla extract
1 cup pumpkin puree
1 cup white chocolate chips
1 cup butterscotch chips *I used semi sweet chips, you could use anything*
1/2 cup pecans, chopped (optional) *I left these out*

Preheat the oven to 350°F. Line a 9×13-inch baking dish with foil. In a medium bowl, combine the flour, pumpkin pie spice, baking soda and salt. Stir together and set aside.

Mix together the butter and sugar on medium-high speed until light and fluffy (about 2 minutes). Beat in the egg and vanilla until well combined. Mix in the pumpkin puree. With the mixer on low speed add the dry ingredients and mix just until incorporated. Fold in the chips that you decide to use (along with the pecans if using those) with a rubber spatula.

Spread the batter evenly into the prepared pan. Bake for 35-40 minutes or until the edges begin to pull away from the sides of the pan and a toothpick inserted in the center comes out with just a few crumbs (I found that if you use the butterscotch chips it is more moist). Transfer the pan to a wire rack and let cool completely before cutting.

And So it begins!

Even though it came at a bad time when I'm trying to lose baby weight, I have found a new love and it's cooking/baking, sadly more baking, hahaha! These past few months I have been trying new recipes almost every day and have been loving every second of it. I have always wanted to be a great cook and I feel like I'm learning more every day and getting better with every recipe I try. My new found love began when I stumbled on a recipe blog called The Girl Who Ate Everything and I got so excited and wanted to try everything! I told my husband about it and I was sooo excited, I think he thought I was crazy :) I made a HUGE list of all the things I wanted to make and haven't looked back since. Since then I have come across sooo many blogs that I LOVE and I am trying new recipes ALL the time. I have added lots of my favourite blogs on the side so if you ever feel stuck for something to make check those blogs out.

Until my skills get better I just wanted to find a home where I could post my favourite recipes that I have made and we have loved. It's so fun to make something and have your kids say that they love it and want you to make it again. I'm loving that I can make something and add my own little twist or know what I could do to make it better for my family the next time I try it. Anyway thank you all you AMAZING cooking ladies (and men I'm sure, hahaha) out there who have inspired me. I think my husband thanks you all too, well apart from all the desserts, I know my neighbour loves that though :)

For now I will start posting things I make but I will also post some things from the past and add pictures when I make them again. I'm ALL about pictures, that was always something that put me off recipes, when they didn't have a picture to go along with them. I like to see what the food looks like so I could see if looked good. I will link to any website/blog that I use so I can give credit to those that actually came up with these yummy recipes. Maybe some day I'll be able to add a bunch of my own recipes but for now THANK YOU to those that put your recipes out there for me to try, I'm LOVING IT!!!